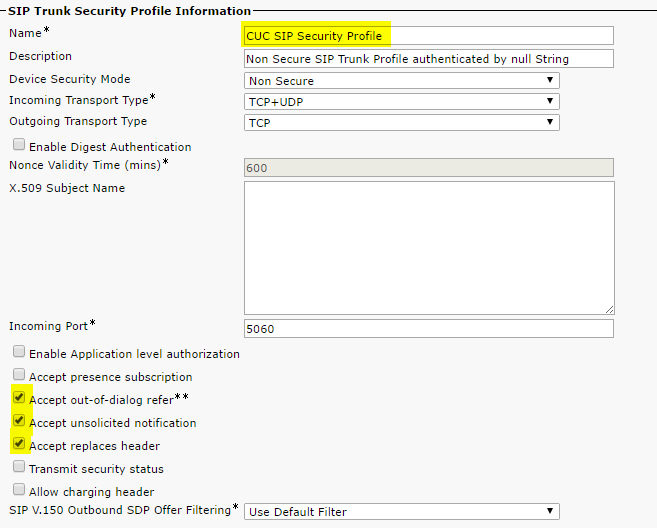
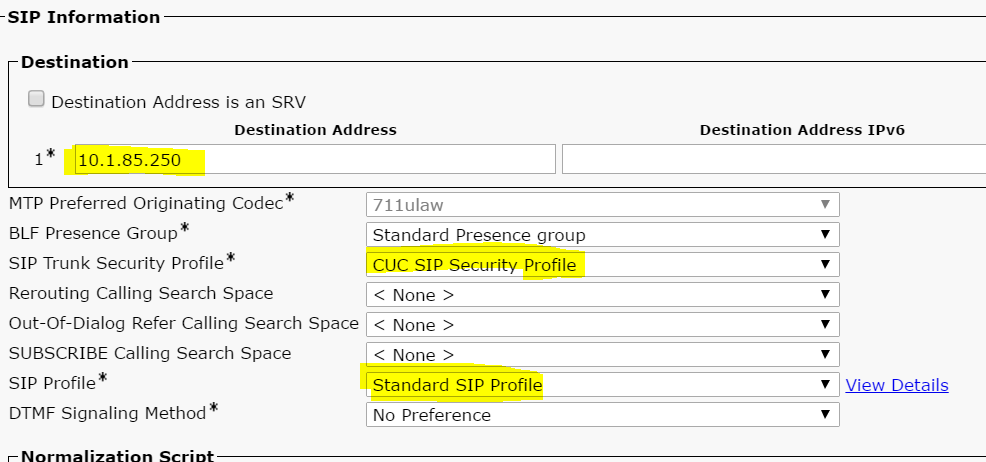
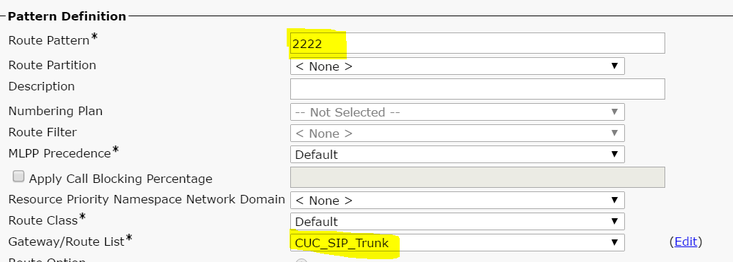
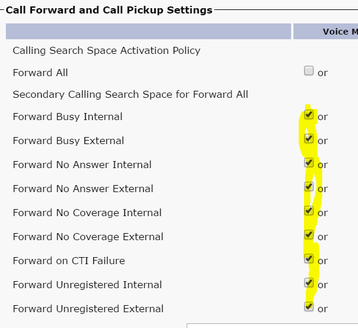
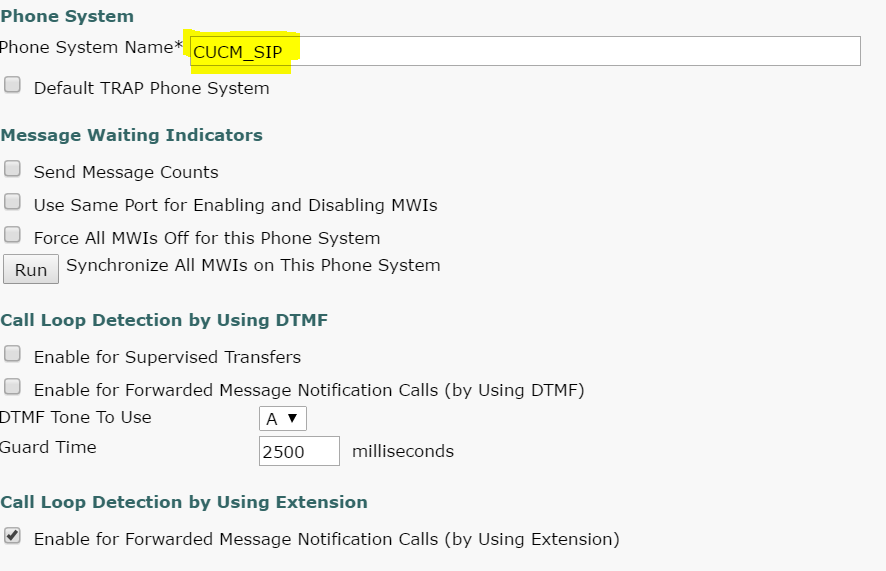
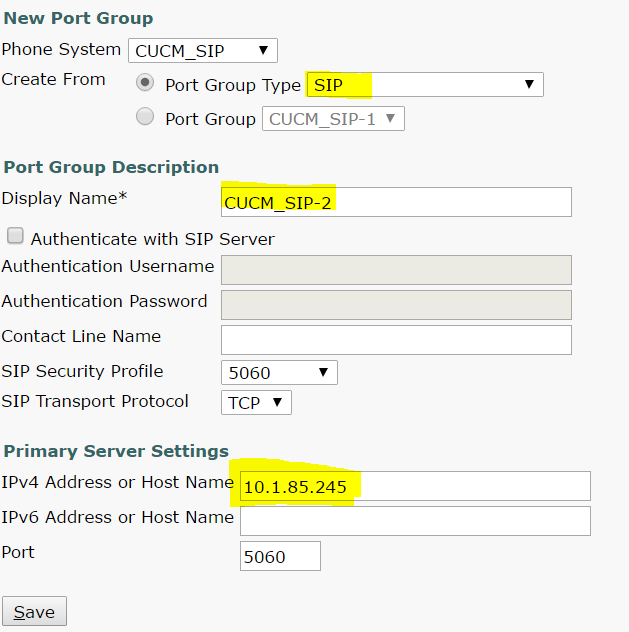
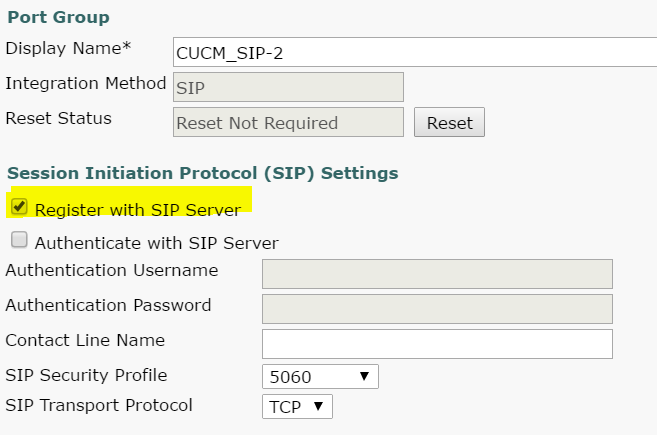
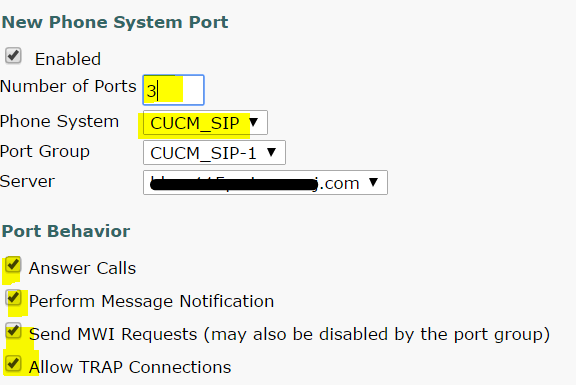
Cisco Communications Manager (CUCM) Integration with Cisco Unity Connection (CUC) using SIP2/27/2017 On CUCM (CUCM Version Used for Screenshots: 11.5.1.11900-26) System --> Security --> Sip Trunk Security Profile Copy the ‘Non Secure SIP Trunk Profile’, enter a new name: For example: ‘CUC SIP Security Profile’. Leave everything else to default. Advanced Features --> Voicemail --> Voice Mail Pilot Either change the ‘Default’ one or create a new one. (We are not adding any Calling Search Space – but it has to be added if needed) Advanced Features --> Voicemail --> Voice Mail Profile Now again, either change the ‘Default’ one or create a new one. Device --> Trunk --> Add New Type in a recognizable name, and add other parameters through the dropdown (like Device Pool, Location, etc) Leave other options as default, but make sure you select the following two: ‘Redirecting Diversion Header Delivery – Inbound’ in the ‘Inbound Calls’ section and ‘Redirecting Diversion Header Delivery – Outbound’ in the ‘Outbound Calls’ section Put the IP Address of the Unity Connection Server in ‘Destination Address’, select ‘SIP Trunk Security Profile’ which was created in the previous section. SIP Profile is a required field, you can select ‘Standard SIP Profile’ for this purpose. Save the trunk configuration. Call Routing --> Route/Hunt --> Route Pattern --> Add New Put in the Voice Mail Pilot DN here as the Route Pattern and select the SIP Trunk created in the previous step. (Keep in mind, I have not created, ‘Route Group’, ‘Route List’ and then applied it here. That method is fine too) At this time, CUCM side of configuration is complete. However, make sure the phones are configured for the phone Voice Mail profile which was created. And they are configured to send un-answered calls to the voice mail. On CUC (CUC Version Used for Screenshots: 11.5.1.11900-26) Telephony Integrations --> Phone System Add a new one or select the existing one Click on ‘Go’ beside ‘Add Port Group’ Select ‘SIP’ as the ‘Port Group Type’, ‘Display Name’ would be pre-populated, enter the IP Address of the CUCM Server in ‘IPV4 Address of Host Name’ and Save. Click on ‘Register with SIP Server’ leave the others to default settings. You can also change the codec advertising if needed. Click on ‘Go’ beside ‘Add Ports’. Note 1: SIP Integration of CUC and CUCM doesn't have MWI On/Off DNs. SIP Integration uses SIP NOTIFY messages to turn ON/OFF the MWI on the phone. Note 2: Ports dictate how many concurrent sessions can occur between CUCM and CUC. In this example, maximum of 3 sessions would exist between CUCM and CUC (for example 3 people would be able to check voicemail at one time because we are using 3 ports or 2 people can check voice mail and one auto attendant session, or any other combination) PS: Until CUC version 8, number of ports was dictated by license. From CUC 9 and later, this is no longer a licensed feature. Ports now depend on the hardware/hardware OVA template used. For CUC 11.x, check this URL for the maximum number of ports supported: http://www.cisco.com/c/en/us/td/docs/voice_ip_comm/connection/11x/supported_platforms/b_11xcucspl.html#ID-2325-00000015 Click on ‘Go’ beside ‘Check Telephony Configuration’ to check if everything is good. If no problems exist, you will see the following: Now the only thing left is to create voicemail boxes and you are good to go.
1 Comment
12/25/2023 01:47:41 am
I wanted to express my gratitude for your insightful and engaging article. Your writing is clear and easy to follow, and I appreciated the way you presented your ideas in a thoughtful and organized manner. Your analysis was both thought-provoking and well-researched, and I enjoyed the real-life examples you used to illustrate your points. Your article has provided me with a fresh perspective on the subject matter and has inspired me to think more deeply about this topic.
Reply
Leave a Reply. |
AuthorSaad is a Senior Collaboration Engineer. He is CCIE x 3 (Collaboration, R&S and Data Center) Categories
All
Archives
May 2022
|





 RSS Feed
