
|
I cannot take credit for creating these mnemonics. They are the result of various online searches and the efforts of others. Kudos to their creators. OSI Layer - Please Do Not Touch Steve's Pet Alligator (Physical, Data Link, Network, Transport, Session, Presentation, Application) Data at Each Stage of OSI Layer - Don't Don't Don't Stop Pouring Free Beer (Data Data Data Segment Packet Frame Bits) OR Some People F*** Bit**es (Segments, Packets, Frames, Bits) TCP/IP Layer - NITA (Network, Internet, Transport, Application) Evaluation Assurance Model - Father Son Mother My Sweet Small Family (F S M M S S F) (Functionally Tested, Structurally Tested, Methodically tested and checked, Methodically designed, tested and reviewed, Semi-formally designed and tested, Semi-formally designed, verified and tested, Formally designed, verified and tested Asymmetric Cryptography = DEREK (Diffie-Hellman ElGamal RSA ECC Knapsack) Symmetric Cryptography = 23BRAIDS (Twofish 3DES Blowfish RC5 AES IDEA DES SAFER) Fire extinguisher - A = Ashes (regular fires like paper and wood) B = Boil (liquids like gasoline) C = Electri C ity D = Dent - like a metal can K = Kitchen (oil/grease) MAC (mandatory access control) is known as the lattice model (Big Mac with Lettuce) MD5 is a 128-bit hash because 8 minus 2 minus 1 = 5 SkipJack has 8 letters. Key size is "80 bits" Twofish - There is a process involved here called Whitening. Mental image of literally 2 fish "whitening" each others teeth.  Blowfish - This is for key size, which can be 32 up to 448. I again think about "blowing" air into a fish, and imagining the fish getting bigger and bigger. Thus, it starts at 32 but can be "blown" up to 448 bits. Biba - The I in biba means Integrity Ring Computing Model: Zero KODU (0 Kernel, 1 OS, 2, Drivers, 3 Users) Retina Scan vs Iris Scan. Retina is a longer word than Iris. Retina is longer hence more detailed hence more intrusive. Iris stays same for the life of the person. Retina are blood vessels. Iris is mostly used. Patent = 20 years. Notice there is the word "ten" in Patent. 10 fits better into 20, than it does 70 (Copyright) Trade Mark is 10 years. USPTO: United States Patents and Trademark Office (Library of Congress takes care of Copyright) (Trade Secret is protected by Economics Espionage Act) RAID 0: Striping - 0 looks like a circle (person going in circles and leaving data everywhere (on both hard drives) RAID 1: Mirroring - 1 or | looks like a mirror Risk = Threat x Vulnerability (RISK TV)  ALE = ARO x SLE
ALE (CAUSES) AROSLE (🍺 = 😍) SLE = AV x EF SLEAVEF (Up my sleeve(f)) ALE = Annual Loss Expectancy SLE = Single Loss Expectancy ARO = Annualized Rate of Occurrence (e.g; 1 flood in 20 years, 1/20 = 0.05) AV = Asset Value (value of asset after depreciation) EF = Exposure Factor (% damage with single occurrence - e.g; 80% of server unusable after a breach) NIST 800-37 (Risk Management Framework) - People Can See I Am Always Monitoring (Prepare, Categorize, Select, Implement, Assess, Authorize, Monitor) Business Continuity Planning
C(ow)P(ig)SOW -
Domain 7 Incident Response: Think of a Drumroll aka DRMRRRL when there is an incident (Detect, Response, Mitigate, Report, Recover, Remediate, Lessons Learnt): In Mitigate, you contain, in Recover, you bring to last good known state, in Remediate, you do RCA/fix the Root Cause) Canons of ISC - PAPA Protect society, the common good, necessary public trust and confidence, and the infrastructure (Social Responsibility, no unethical hacking), Act honorably, honestly, justly, responsibly, and legally (Maintain Integrity, don't lie, etc) Provide diligent and competent service to principals (Protect organization you are working for) , Advance and protect profession (Don't share exam questions, false endorsement) CSUSAD - Information Lifecycle (Create, Save, Use, Share, Archive, Destroy) Fagan Inspection (Code Review): Planets Orbit Perfectly In Round Formations (Planning, Overview, Preparation, Inspection, Rework, Followup) Domain 8 Software Capability Maturity Model (IDEAL is the other model) - How mature is your capability? (Think of mature software developers liking Oreo cookies) I Really Don't Mind Oreos (Initiating, Repeatable (lifecycle management, proper QA), Defined (documented), Managed (is Quantitative, and Quality Mgmt), Optimized(Change Management is followed) Change Management Process - Red Rabbits Are Trained In Dancing (Request, Review, Accept/Reject, Testing, Implement, Document) Change and Configuration Management - Rabbits Chasing Rabbits (Request, Change Control, Release Control)(Request - Red, Change Control - Rabbits Are Trained, Release Control - In Dancing) 5 Phases of SDLC RDITE - Real Developers Ideas Take Effort (Requirements Analysis, Design, Implementation, Testing, Evolution) Work in Progress Below Agile is a Framework: Scrum (most popular), Kanban and SAFe are examples are Agile Framework. DevOps or DevSecOps can be used alongside Agile 3. Bell-Lapdula - I made a little one-liner jingle for this. I say it like this: Bell, LA PA DU LA - CON FI DEN SHI AL IT E. I've repeated this many times in my head, and in fact, I recall this from my SSCP studies 4 years ago. 4. Running key (or “book”) ciphers often use a passage from a commonly available book as the encryption key. I remember this because in IT, we use a "Run book", so anytime I see a practice question asking How a Running key works, I remember "Run Book". 10. TCSEC vs ITSEC = Orange Book. Orange has vitamin C in it, ITSEC does not. Threat Modelling:
Standards / Acts / Regulations ISO 27001 -> info sec mgmt system ISO 22301 -> BCP MS – business continuity management system PCI-DSS -> card security NIST 800-37 -> IS information security FEDRAMP -> Federal risk and authorization program GLBA act – Privacy Financial services SOX -> Publicly Traded Companies – s not a standard but a law for publicliy traded companies doing business in US PIPEDA - > Canada - Personal Information Protection and Electronic Documents Act of Canada GDPR -> EU – Privacy HIPPS -> Healthcare
1 Comment
Cisco Collaboration Flex Plan is available in the following license models:
The price changes based on the Flex version that is sold. Currently Cisco is selling Flex 3.0.  Today my heart is bleeding.... April 9 was a dark day in the history of Pakistan. This day would be remembered in days to come. A regime change happened in Pakistan - ousting the current sitting PM Imran Khan (IK). I hope IK get a second chance to come back in power - else people of Pakistan would never forgive those responsible for this. The whole opposition consisting of many parties united to beat this one-man IK and his political party Tehreek e Insaf - PTI (Movement for Justice) which IK started in 1996. Tehreek e Insaaf was never a threat to any political party until the recent elections in 2018 where it built much momentum before the elections - and it won. Imran was born in an affluent upper middle-class family in Lahore Pakistan. IK attended the prestigious school Aitchison College (established 1866) in Lahore, joining Royal Grammar School Worcester in England and finally graduated from Oxford where he studied Philosophy, Politics and Economics, graduating in 1975. IK played cricket (college, county and national) while in Pakistan, then in England and continued to play until 1992. IK retired from Pakistan's national side after he captained the Pakistan Cricket Team and winning the only cricket world cup for Pakistan in 1992. After the World Cup win, Imran Khan built a cancer hospital in Lahore (Shaukat Khanum - named after his mother who died of cancer) - which still provides free treatment to people who cannot afford the treatment. This was a amazing feat as something like this hasn't happened in the world where the expensive cancer treatment is provided for free - run entirely on charity. After his political struggle for 22 years, IK disrupted the political landscape of Pakistan by taking the reigns of the country from the two-party system (PPP and PML-N) and by becoming PM in 2018 at the age of 66. Before Khan, people of Pakistan were tired of political party’s broken promises and seeing same faces years after years, elections after elections. In Khan's PM acceptance speech, he mentioned that he wants to make Pakistan a welfare state and promised to help the most neglected of the community. He was ridiculed for this as well by the opposition. However, if anyone was capable of this insurmountable task, it was Khan. It was an uphill battle to run a country at that time. Pakistan was in a disarray when IK held the reigns of the country. The previous government had left the country in a deficit. Pakistan was being run with the money which was lent by World Bank. And just to pay the interest on the World Bank loans, previous governments had gone to IMF to borrow money so that interest could be paid to the World Bank. And to pay back the interests on loans to IMF, they had taken more loans from IMF. This was going on for a while. It seemed though that no one before Khan cared about this. To put this in perspective, this is like the head of the family has a credit card, and to pay the minimum payments on the credit card, the head used another credit card, once that second card is maxed out, a third credit card is used so minimum payments can be done on that second credit card, and on and on... Since he became the Prime Minister, he tried making changes to the grass root level. Some changes he succeeded, some he did not - but no one ever questioned his intentions. He was genuinely trying hard - removing ministers who weren't able to perform. During his tenure, government of Pakistan collected record number of taxes, increased exports (despite COVID-19 where lot of countries in same regions had negative growth), and so many other great things (see list below). 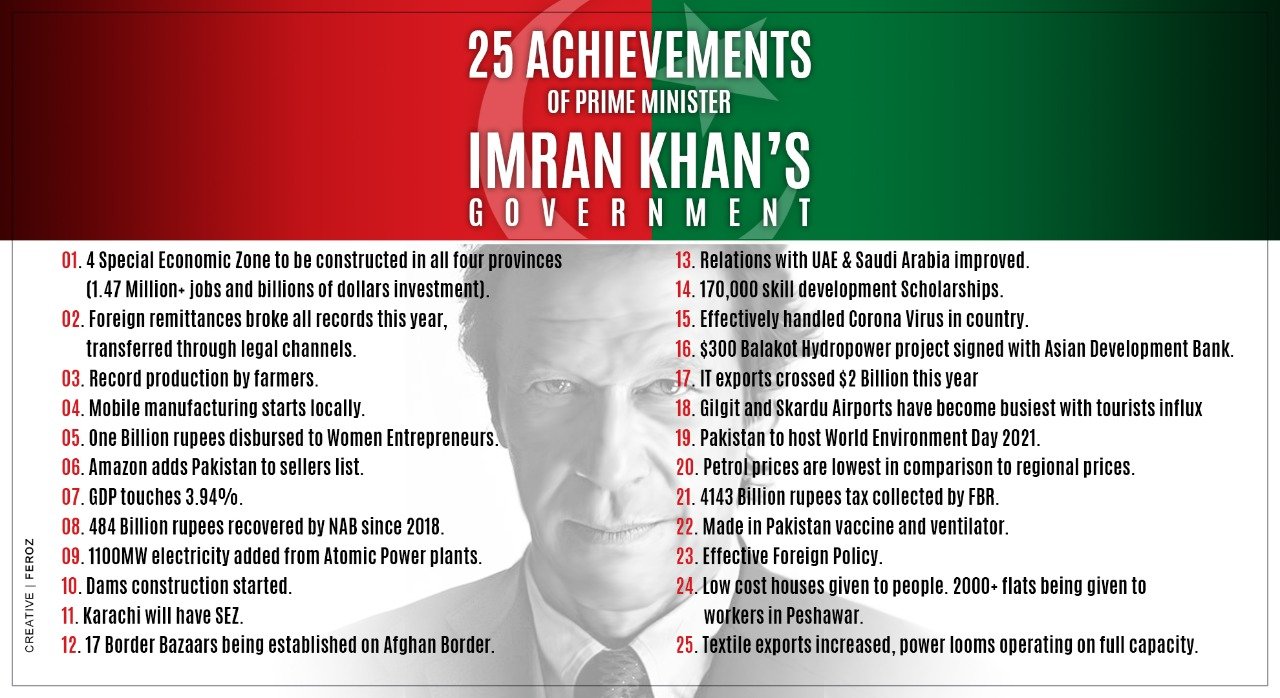 His opposition never was able to find any dirt on him. They kept on bringing up his playboy lifestyle from his time in London, but other than that, there were no cases of corruption, no foreign properties, no bank accounts, etc. It is worth mentioning that after becoming PM Khan was not living at the official PM House which was available to him. He would pay for the expenses for his residence himself. He would go to PM Office in the morning and go back to his personal residence in the evening - working long hours and not taking any days off. Despite his great health, I am sure this wasn't easy in his 66+ years of age. While IK was busy working, the opposition had all united to put a notion of No-Confidence in the parliament against him. Some of his coalition partners had joined the opposition. The number of MNAs needed to make this notion successful was 172 - opposition pulled it off by a thin margin of 174. PTI insisted that there is a US conspiracy to uproot his government. PTI said that a cipher had come from a US Diplomat Donald Lu which had clearly mentioned in a threatening manner that the vote of No-Confidence has to succeed in the parliament against IK for US to make things easy for Pakistan. There were proofs of meetings of US Officials with the MNAs which switched sides and with opposition leaders and opposition MNAs. Some media outlets reported of money given to some members of his party members so that they would become part of the opposition succeeding the vote of no confidence. IK and PTI had agreed to shared the Donald Lu's cipher with the Army, National Security Council and with the Opposition Leaders. Opposition Leaders weren't interested to see it. Opposition without seeing it insisted that the letter it was a lie. US denied their involvement in this. When Donald Lu was asked by the media, he neither accepted nor denied this cipher. On the late night of April 9, after the No Confidence motion succeeded, Imran Khan for one last time went to his residence with his belongings (his diary and some papers).  The Roman Emperor Marcus Aurelius once said: When a bunch of known corrupt people unite against one man and spare no effort to ridicule him, blackmail him and attempt to assassinate his character, blindly follow that one man!
Today, I am disappointed, I am sad, I am angry. I truly hope you are given another chance. Webex offers a few different Webex Edge options. They can be confusing. I will try to outline what they are and what do they do: 1. Webex Edge AudioWebex Edge is a great cost saving feature for customers who utilize Webex Meetings and CUCM... This allows Webex Meetings to route PSTN calls through the internet and leverage on-premise CUCM for Webex Meetings Outbound/Call-Back feature - saving $$ on the Webex PSTN costs.. 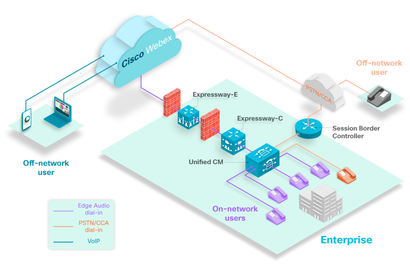 Here is a webex.com article on Webex Edge Audio. 2. Webex Edge ConnectWebex Edge Connect allows a customer to have a private point-to-point link between their network and Cisco Webex (Meetings and Calling) Cloud. This allows to by-pass public internet - thus guaranteeing bandwidth and quality of service (QoS). Here is a webex.com article on Webex Edge Audio. 3. Webex Edge Video MeshWebex Edge Video Mesh allows local (on-prem) media processing for cloud based media services thus improving the customer experience for on-prem users.
It is a software which is installed on-prem which is cloud managed by the Webex Control Hub. Here is a cisco.com article covering all of Webex Edge products. Misc
Webex Meetings
 CCaaS - Webex Contact Center
CPaaS - Webex Connect
Agnostic Meetings
Developer Solutions |
AuthorSaad is a Senior Collaboration Engineer. He is CCIE x 3 (Collaboration, R&S and Data Center) 
Categories
All
Archives
May 2022
|


 RSS Feed
