
|
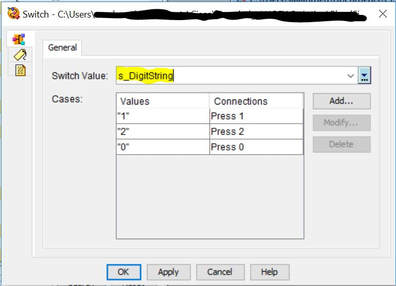
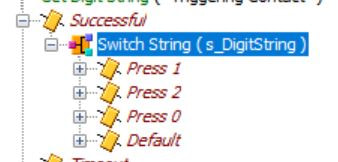
Happy new year to everyone. It's been a while since I wrote a new blog entry - it's new year, so here is the brand new blog entry for 2018. There are couple of UCCX Script editing steps which can be used when creating menus on UCCX Scripts - they can be used interchangeably. Two of these steps are 'Switch' and 'Menu' Switch Step Switch step is found under the General category on UCCX Script editor. 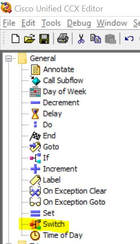 Switch step is like 'if, then, else' in software programming. It would be easier to explain using an example: Lets assume we need to create an auto attendant script where the call in user is asked to enter: 1 for Sales (redirects to extension 2001) 2 for Marketing (redirects to extension 2002) 0 for Operator (redirects to extension 2003) or press the extension of the person you need to dial. To start off (after the other basic steps of accepting the call, etc) I would use a Play Prompt step (under Media) to play the recording : "Press 1 for sales, press 2 for marketing, 0 to speak to an operator, or if you know the extension of the person, just dial that extension" 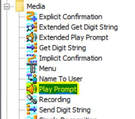 Once the recording has been played, the user would enter the digits on the phone. I have to capture those digits. I would use a string to capture the the digits entered by the user. I would create a parameter on script editor, where I would store the value which was entered by the user (1, 2, 3, extension). I have named this Parameter s_DigitString (s is the name distinguishes its a string, DigitString in the name distinguishes the purpose). The default value is empty. 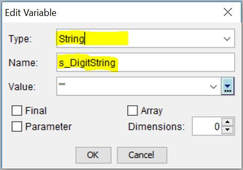 To capture the digits, we need to create a 'Get Digit String' step to capture the digits in the s_DigitString. Get Digit String is available under the 'Media' steps on UCCX editor. Once the digits have been captured, now comes the Switch step. Switch step will look at the digits that are entered in the s_DigitsString and will perform the action based on the captured digit. Here are the properties of the Switch step.
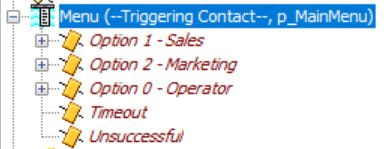
Under Press 1, Press 2, Press 0, you can define where to redirect the call to (using the Call Redirect step). 'Dial by Extension' would rely on 'Default' on the above right picture (overlapping extension can be dealt with by modifying timers on the Get Digit String, so dialing extension 2112 won't be a problem). This is in nutshell is how a Switch step works. Now lets move to Menu step. Menu Step Menu step is found under Media category on the UCCX Editor. 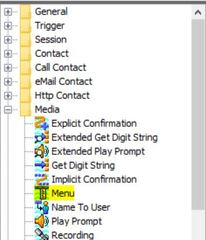 Menu step combines the functionality of these three steps in one:
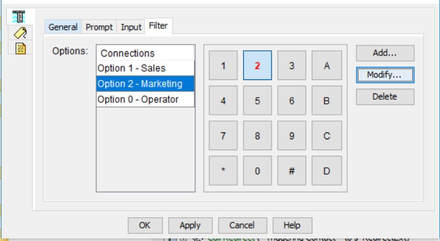
The second tab, Prompt on the Menu properties is where you define the Prompt that will be played. 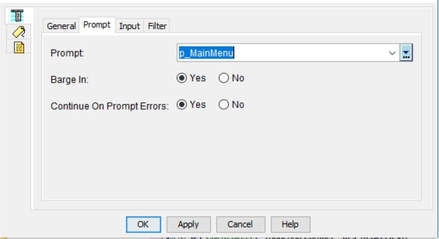 The third tab, Filter on the Menu properties is where you define the key inputs and the action that will be taken.
Filter in Menu creates the same options as Cases in Switch. However, one big difference is that it allows only one digit entry. Moreover, in Menu, we don't save the user input in a variable (s_DigitString above). Hence, only one digit can be entered. This becomes an issue when the users is trying to dial an extension of a user.
To close off, I would invariably use Menu always unless I have to register more than one digit. Menu makes things lot more easier, but then the problem with Menu is that you cannot enter an extension 2112 for example. It would just register that as Option 2 with Menu. Hope this helps.
2 Comments
Two commands: 'e164-pattern-map' (added from IOS 15.2) and 'server-group' (added from IOS 15.4) makes Voice Gateway/CUBE config dial-peers config very clean.
With e164-pattern-map, the digits to be matched can be groped together. So no need for multiple dial-peers (with just the changing destination-pattern). With server-group, all the session target (session target ipv4:x.x.x.x) can be grouped together. So no need for multiple dial-peers with just the changing session target ipv4: is required. Here is an example which will make things more clear: voice class e164-pattern-map 10 e164 911 e164 9[2-9]..[2-9]...... e164 91[2-9]..[2-9]...... e164 9[^1]T description OUTBOUND_CALLS voice class e164-pattern-map 20 e164 +1416555[12]... description INBOUND_CALLS voice class server-group 10 ipv4 140.1.4.5 preference 1 ipv4 140.1.5.5 preference 2 description to PSTN_SIP_PROVIDER ! voice class server-group 20 ipv4 10.1.100.1 preference 1 ipv4 10.1.101.1 preference 2 description to CUCM dial-peer voice 10 description OUTBOUND_PSTN_CALLS destination e164-pattern-map 10 translate-called PSTN_FORMAT session protocol sipv2 dtmf-relay rtp-nte session server-group 10 dial-peer voice 11 description INBOUND_FROM_PSTN incoming called e164-pattern-map 20 session protocol sipv2 dtmf-relay rtp-nte session server-group 10 dial-peer voice 20 dial-peer voice 20 description TOWARDS_CUCM destination e164-pattern-map 20 session protocol sipv2 dtmf-relay rtp-nte session server-group 20 dial-peer voice 11 description INBOUND_FROM_CUCM incoming called e164-pattern-map 10 session protocol sipv2 dtmf-relay rtp-nte session server-group 10 dial-peer voice 20 voice translation-rule 10 rule 1 /^911$/ /911/ rule 2 /^9/ /+/ voice translation-profile PSTN_FORMAT translate called 10 I have used a translation-profile to convert the dialed-numbers to +E164 numbers (except for 911 calls). This config is not required - it depends what format the PSTN is expecting the call. I have assumed that this telco here is expecing +E164 numbering format except for 911 calls. By the way, under the e164-pattern-map command, other than actual e164 numbers (like in example above), url could be used. which can point towards a file on the flash or ftp somewhere which can have the numbers. With digit manipulation on IOS, keep a few things in mind:
1. / -- / - It always starts with / and ends with / 2. Anything within parenthesis would be kept. characters are keep are like (a\) characters to ignore are like b\ \1 copy the first set into the replacement number, \2 copy the second set into the replacement number, etc 3. The following represents the digits/characters: . : Any single digit 0 to 9,*,# : Any specific character [0-9] : Any range or sequence of characters * : Modifier—match none or more occurrences + : Modifier—match one or more occurrences ? : Modifier—match none or one occurrence Look at the following examples. This should clarify: Examples: Example 1: voice translation-rule 1 rule 1 /123/ /456/ Will match and modify 123 anywhere in the pattern: router#test voice translation-rule 1 123 Matched with rule 1 Original number: 123 Translated number: 456 router#test voice translation-rule 1 1234 Matched with rule 1 Original number: 1234 Translated number: 4564 router#test voice translation-rule 1 6123 Matched with rule 1 Original number: 6123 Translated number: 6456 router#test voice translation-rule 1 6123123 Matched with rule 1 Original number: 6123123 Translated number: 6456123 Example 2: voice translation-rule 1 rule 1 /^123/ /456/ Will match only if the pattern start with 123 because carrot '^' is the starting character router#test voice translation-rule 1 123 Matched with rule 1 Original number: 123 Translated number: 456 router#test voice translation-rule 1 1234 Matched with rule 1 Original number: 1234 Translated number: 4564 router#test voice translation-rule 1 6123 6123 Didn't match with any of rules Example 3: voice translation-rule 1 rule 1 /^123$/ /456/ Will only match if the pattern starts if its 123 exacly. Nothing after, nothing before. router#test voice translation-rule 1 123 Matched with rule 1 Original number: 123 Translated number: 456 router#test voice translation-rule 1 1234 1234 Didn't match with any of rules router#test voice translation-rule 1 6123 6123 Didn't match with any of rules Example 4: voice translation-rule 1 rule 1 /^40.../ /6666000/ Will match pattern starting with 40 and any 3 digits afterwards router#test voice translation-rule 1 40123 Matched with rule 1 Original number: 40123 Translated number: 6666000 Example 5: voice translation-rule 2 rule 1 /.*/ /5554000/ Will replace any pattern with 555400 router#test voice translation-rule 2 123 Matched with rule 1 Original number: 123 Translated number: 5554000 router#test voice translation-rule 2 86573 Matched with rule 1 Original number: 86573 Translated number: 5554000 router#test voice translation-rule 2 "" Matched with rule 1 Original number: Translated number: 5554000 Example 6: voice translation-rule 1 rule 1 /^\(12\)3\(45\)$/ /6\1\2/ Set 1: 12 Set 2: 45 Ignore: 3 router#test voice translation-rule 1 12345 Matched with rule 1 Original number: 12345 Translated number: 61245 Example 7: voice translation-rule 10 rule 1 /\(32..\)$/ /416555\1/ Will replace 32xx to 41655532xx (used for outbound caller ID) router#test voice translation-rule 10 3200 Matched with rule 10 Original number: 3200 Translated number: 4165553200 Example 8: voice translation-rule 10 rule 1 /^416555\(32..\)$/ /\1/ Will replace 4165553211 to 3211 (used for inbound caller ID) router#test voice translation-rule 10 4165553211 Matched with rule 10 Original number: 4165553211 Translated number: 3211 Example 9: voice translation-rule 7 rule 1 /^4/ /904/ type national national rule 2 /^4/ /9004/ type international international If number starts with 4 and type is National, it would be prefixed 90 and type will remain National If number starts with 4 and type is International, it would be prefixed 900 and type remain International router#test voice translation-rule 7 493456567 type national Matched with rule 1 Original number: 493456567 Translated number: 90493456567 Original number type: national Translated number type: national Original number plan: none Translated number plan: none router#test voice translation-rule 7 493456567 type international Matched with rule 2 Original number: 493456567 Translated number: 900493456567 Original number type: international Translated number type: international Original number plan: none Translated number plan: none Example 10: voice translation-rule 8 rule 1 /^2\(...$\)/ /01779345\1/ type unknown national plan unknown isdn This rule matches any four-digit number that starts with "2". The rule removes the "2", adds the number "01779345" as a prefix, and sets the plan to "isdn" and the type to "national". router#test voice translation-rule 8 2001 type unknown plan unknown Matched with rule 1 Original number: 2001 Translated number: 01779345001 Original number type: unknown Translated number type: national Original number plan: unknown Translated number plan: isdn POTS Dial-Peers --------------- dial-peer 911 pots destination-pattern 911$ !Anything that is explicitly matched on POTS dial-peer is removed. This isn't true for VOIP. VOIP Dial-peer doesn't remove anything thats explicity matched. no digit strip <OR> prefix 911 <OR> forward-digits 3 port 0/0/0:23 dial-peer 9 pots destination-pattern 9[2-9]XX[2-9]XXXXXX$ port 0/0/0:23 ! no need for any prefix or any forward digits as only number explicitly matched is 9 which we want removed as its our PSTN code. dial-peer 91 pots destination-pattern 91[2-9]XX[2-9]XXXXXX$ prefix 1 <OR> forward-digits 11 ! 1 is being explicitly matched and we want it to go out as its our long distance code used by the PSTN. port 0/0/0:23 dial-peer 9011 pots destination-pattern 9011T ! no need for #. It would be automatically matched because of the next dial-peer. prefix 011 ! can't use forward-digits as we don't know the extension length that would be dialed. port 0/0/0:23 dial-peer terminator # ! Its a default command and any call with # is already a terminator for interdigit timeout, unless its changed by someone. Note: On CUCM, in Service Parameters "Strip # Sign from Called Party Number" is "True" by Default - Meaning it would remove # as the trailing number. dial-peer 1 pots incoming called-number . ! will match incoming calls dial-peer 2 voip destination-pattern 2...$ session target ipv4:10.1.1.2 ! CUCM IP dtmf-relay h245-signal dial-peer 3 voip incoming called-number . Overlap Sending <-- SCCP works this way - one digit at a time. En-Bloc <-- CUCM works this way. A good document which I consulted when working on this post: http://www.cisco.com/c/en/us/support/docs/voice/call-routing-dial-plans/61083-voice-transla-rules.html 1. ENABLING THE SERVICE
GO to Cisco Unified Serviceability, Tools --> Service Activation. Make sure Cisco Extension Mobility service is enabled. If not enabled, enable it. 2. CREATING THE SERVICE a. GO to CUCM Administration, Device --> Device Settings --> Phone Services. b. Add new. Enter the name such as EM or Extension Mobilty c. Enter the URL: URL: http://<CUCM IP>:8080/emapp/EMAppServlet?device=#DEVICENAME# d. Choose XML Service and Standard IP Phone Service as the Service Category and Service Type respectively. e. Click Save. 3. CONFIGURING PHONES a. Go to Device --> Phone, open the phone where you want to enable the service. b. Related links on top of the page, select Subscribe/Unsubscribe Services and click GO. c. Select the service created on CREATING THE SERVICE above. d. Subscribe and Save. e. Make sure 'Enable Extension Mobility' is checked on the Phone. NOW PHONES HAVE SERVICE ENABLED, BUT USERS ARE STILL NOT ENABLED FOR EM. NOW LETS ENABLE USERS 4. CONFIGURING USER DEVICE PROFILE (UDP) a. GO to Device --> Device Settings --> Device Profile b. Add New c. Select Phone type (according to the phone type where the user will log into) d. Select Device Protocol <-- You will only be presented with the Protocl option if the Phone is question supports both SIP and SCCP. e. Select a name: such as "User1" and fill in all required fields <-- Most of these options are similar to creating a phone - only difference is there is no MAC Address option here. f. Related links on top of the page, select Subscribe/Unsubscribe Services and click GO. g. Select the service created on CREATING THE SERVICE above. h. Click on 'Line [1] - Add a new DN' and enter line information (just like you would do on an IP Phone) i. Click Save. 5. CONFIGURING USERS a. Go to User Management --> End Users b. Open an existing user or create a new one. c. Make sure userid, password, pin, and phone number are configured. d. Also under 'Extension Mobility' select "User1" (or whichever user was created on CONFIGURING USER DEVICE PROFILE) and move it down to the controlled profiles section. JTAPI stands for Java Telephony API. It was developed by Java for Computer Telephony Applications or CTIs. It provides a set of packages which provides basic guidelines for placing, answering and dropping a call. JTAPI is similar to TAPI (Telephony API) which was developed by Microsoft and Intel.
AXL stands for Administrative XML. AXL is used for pushing config on another system. When integrating another system with CUCM (for example UCCX), JTAPI is used for CTI (placing call, ending call), and AXL is used to push the config onto CUCM. a. Create a Gateway (MGCP/H323) or SIP Trunk (SIP Gateway)
b. Create Route Group (RG), add the above created Gateway/SIP Trunk c. Create Route List (RL) --> Select "Standard Local Route Group" for Route Group c. Create Route Pattern (RP) - for example 911 --> Select the RL (as created in step c) d. Device Pool --> Select Local Route Group (as created in step b) In CUCM CTI Route Points and CTI Ports are often used interchangeably.
However there is a difference.
Most IVR based applications on CUCM however use CTI Ports to enable Post Routing capabilities. Directory Integration with a Multi-Forest Environment is supported in CUCM through Active Directory Light Weight Directory Service (AD LDS). Once AD LDS is configured, the configuration on Cisco side is very similar to doing a regular LDAP integration on CUCM. AD LDS runs as a service on one of the Domain Controllers. In the picture below, the AD LDS could be installed on any of the DCs as long as that DC can speak to the other DCs. A good configuration guide can be found here: https://supportforums.cisco.com/document/63136/how-configure-unified-communication-manager-directory-integration-multi-forest 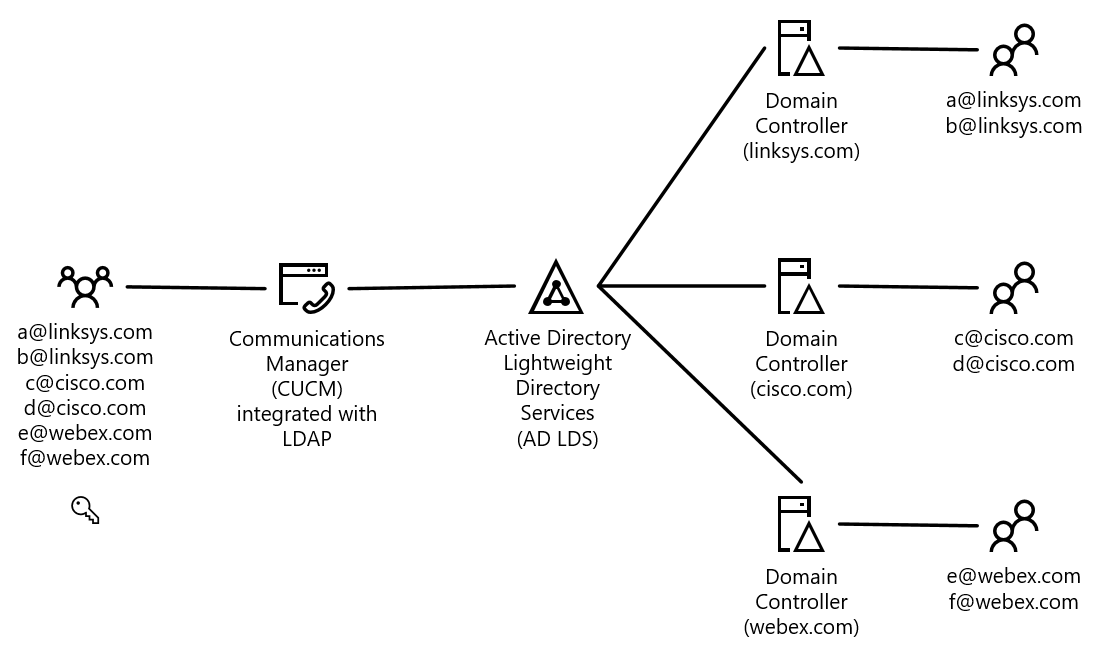 This is an example of Dial-Peers how they are configured on an Cisco IOS Gateway which is registered to CUCM.
A rule of thumb, each call has two call-legs, hence two dial-peer have to be matched with incoming and outgoing call. ! This example assumes that PRI is being used for PSTN calls. If SIP is the service used, it would be similar dial-peers but voip and some other changes like dtmf, destination IPv4, etc. Inbound from PSTN (Dial-peers 1 and 2 below - 2 call legs) ! Incoming Dial-Peer to receive calls from outside PSTN. dial-peer 1 pots incoming called-number . ! '.' will match any digit and any preceding digits. If this was a .$ then only one digit would be matched direct-inward-dial ! Other leg of the incoming call going towards CUCM ! This dial-plan assumes that telco send 4 digit calls to the customer in the format 2XXX. dial-peer 2 voip destination-pattern 2...$ session target ipv4:10.1.1.2 ! CUCM IP dtmf-relay h245-signal Outbound from CUCM to PSTN (Dial-peers 3 to recieve calls from CUCM and rest of dial-peers to send to PSTN - 2 call legs) ! Incoming Dial-Peer to receive calls from CUCM. dial-peer 3 voip incoming called-number . session target ipv4:10.1.1.2 ! CUCM IP dtmf-relay h245-signal ! For emergency calls ! Other leg of the outgoing call going towards PSTN - based on the number dialed. One of these will be used to call PSTN. dial-peer 911 pots destination-pattern 911$ no digit strip <OR> prefix 911 <OR> forward-digits 3 !Anything that is explicitly matched on POTS dial-peer is removed. ! This isn't true for VOIP. VOIP Dial-peer doesn't remove anything that is explicitly matched. port 0/0/0:23 ! 10 digit North American calls dial-peer 9 pots destination-pattern 9[2-9]XX[2-9]XXXXXX$ port 0/0/0:23 ! no need for any prefix or any forward digits as only number explicitly matched is 9 which we want removed as its our ! PSTN code. ! 11 digit North American Long Distance calls dial-peer 91 pots destination-pattern 91[2-9]XX[2-9]XXXXXX$ prefix 1 <OR> forward-digits 11 ! 1 is being explicitly matched and we want it to go out as its our long distance code used by the PSTN. port 0/0/0:23 ! International Calls dial-peer 9011 pots destination-pattern 9011T ! International calls dialed with # in the end would be matched too. It would be automatically matched because of the next dial-peer. Next dial-peer is default so it isn't visible in the config. prefix 011 ! can't use forward-digits as we don't know the extension length that would be dialed. port 0/0/0:23 dial-peer terminator # ! Its a default command and any call with # is already a terminator for interdigit timeout, unless changed by someone. Note: On CUCM, in Service Parameters "Strip # Sign from Called Party Number" is "True" by Default - Meaning it would remove # as the trailing number. Cisco Communications Manager (CUCM) Integration with Cisco Unity Connection (CUC) using SIP2/27/2017 On CUCM (CUCM Version Used for Screenshots: 11.5.1.11900-26) System --> Security --> Sip Trunk Security Profile Copy the ‘Non Secure SIP Trunk Profile’, enter a new name: For example: ‘CUC SIP Security Profile’. Leave everything else to default. 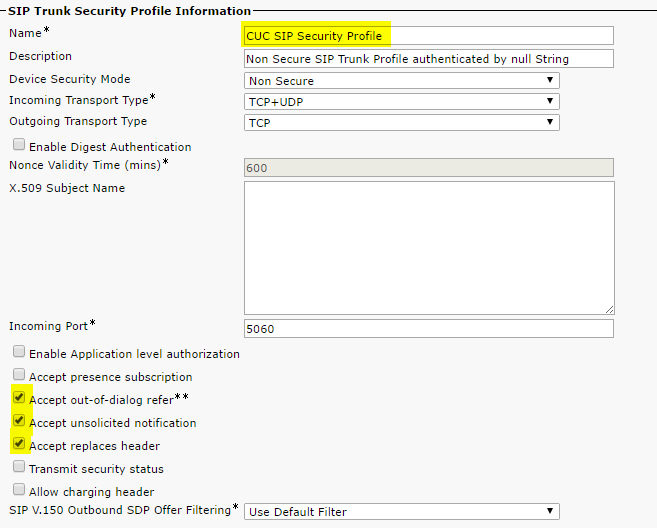 Advanced Features --> Voicemail --> Voice Mail Pilot Either change the ‘Default’ one or create a new one. (We are not adding any Calling Search Space – but it has to be added if needed) Advanced Features --> Voicemail --> Voice Mail Profile Now again, either change the ‘Default’ one or create a new one. Device --> Trunk --> Add New Type in a recognizable name, and add other parameters through the dropdown (like Device Pool, Location, etc) Leave other options as default, but make sure you select the following two: ‘Redirecting Diversion Header Delivery – Inbound’ in the ‘Inbound Calls’ section and ‘Redirecting Diversion Header Delivery – Outbound’ in the ‘Outbound Calls’ section Put the IP Address of the Unity Connection Server in ‘Destination Address’, select ‘SIP Trunk Security Profile’ which was created in the previous section. SIP Profile is a required field, you can select ‘Standard SIP Profile’ for this purpose. Save the trunk configuration. 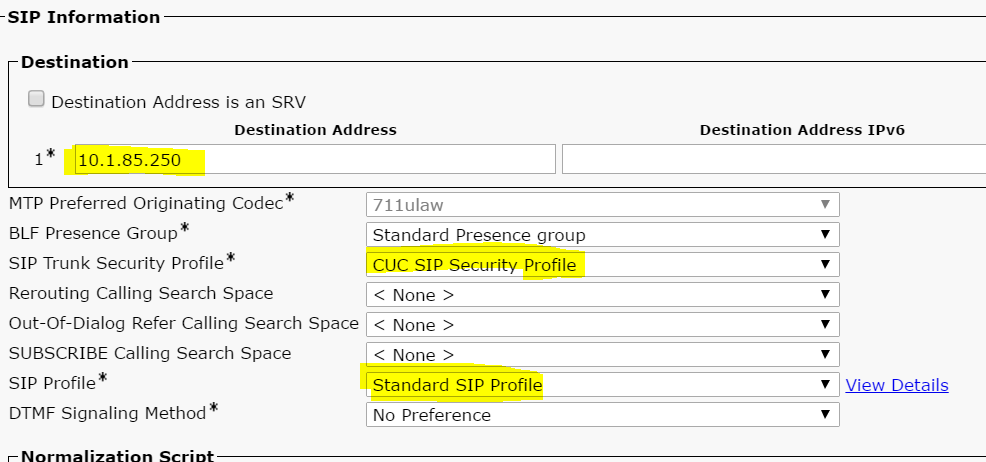 Call Routing --> Route/Hunt --> Route Pattern --> Add New Put in the Voice Mail Pilot DN here as the Route Pattern and select the SIP Trunk created in the previous step. 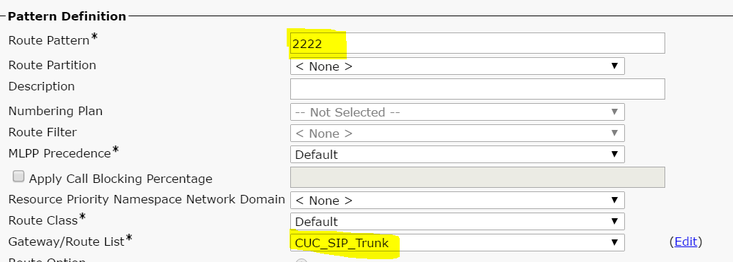 (Keep in mind, I have not created, ‘Route Group’, ‘Route List’ and then applied it here. That method is fine too) At this time, CUCM side of configuration is complete. However, make sure the phones are configured for the phone Voice Mail profile which was created. And they are configured to send un-answered calls to the voice mail. 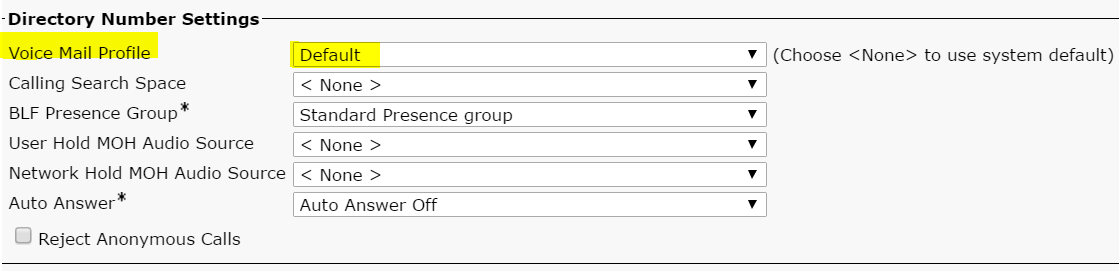 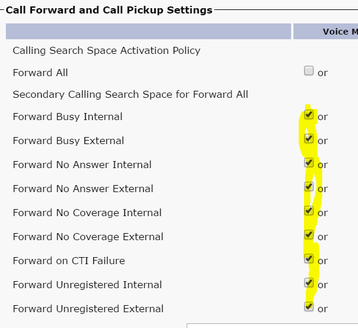 On CUC (CUC Version Used for Screenshots: 11.5.1.11900-26) Telephony Integrations --> Phone System Add a new one or select the existing one 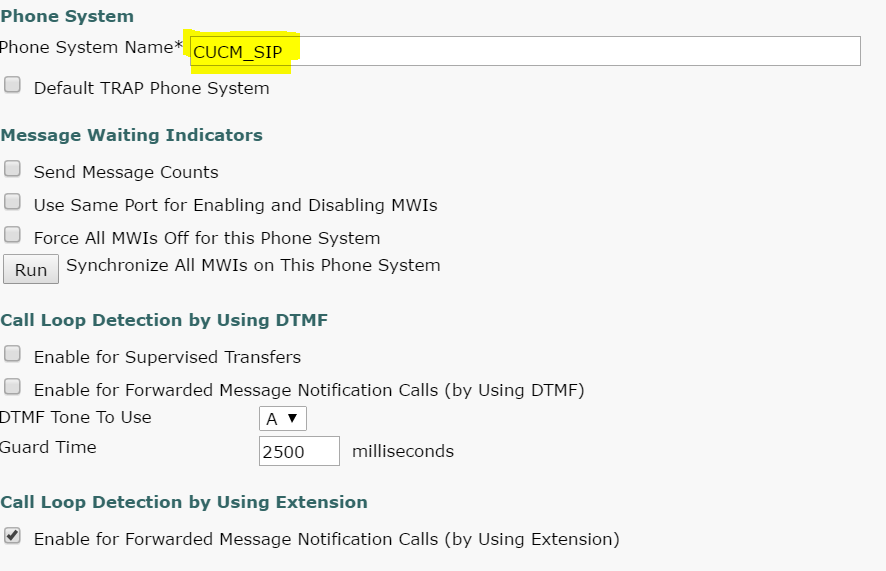 Click on ‘Go’ beside ‘Add Port Group’  Select ‘SIP’ as the ‘Port Group Type’, ‘Display Name’ would be pre-populated, enter the IP Address of the CUCM Server in ‘IPV4 Address of Host Name’ and Save. 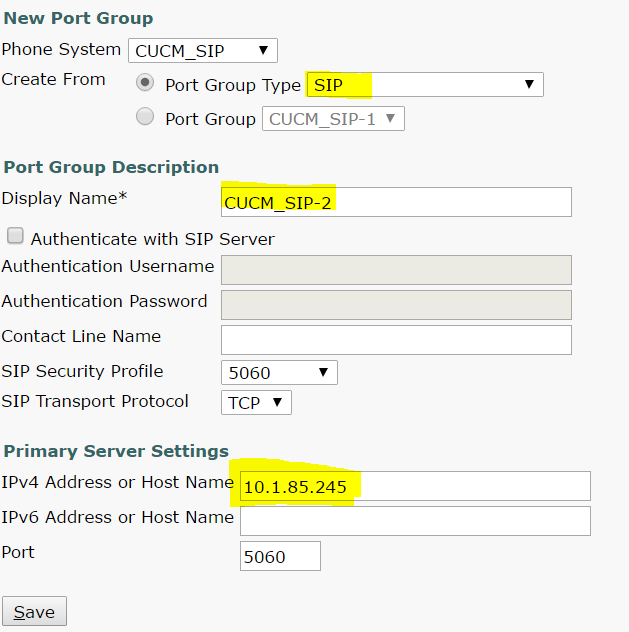 Click on ‘Register with SIP Server’ leave the others to default settings. You can also change the codec advertising if needed. 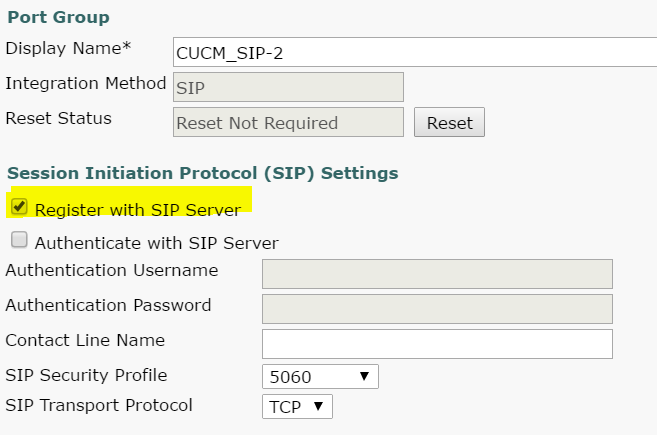 Click on ‘Go’ beside ‘Add Ports’. Note 1: SIP Integration of CUC and CUCM doesn't have MWI On/Off DNs. SIP Integration uses SIP NOTIFY messages to turn ON/OFF the MWI on the phone. Note 2: Ports dictate how many concurrent sessions can occur between CUCM and CUC. In this example, maximum of 3 sessions would exist between CUCM and CUC (for example 3 people would be able to check voicemail at one time because we are using 3 ports or 2 people can check voice mail and one auto attendant session, or any other combination) PS: Until CUC version 8, number of ports was dictated by license. From CUC 9 and later, this is no longer a licensed feature. Ports now depend on the hardware/hardware OVA template used. For CUC 11.x, check this URL for the maximum number of ports supported: http://www.cisco.com/c/en/us/td/docs/voice_ip_comm/connection/11x/supported_platforms/b_11xcucspl.html#ID-2325-00000015 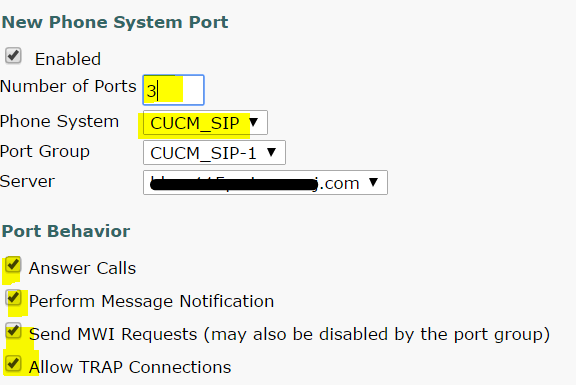 Click on ‘Go’ beside ‘Check Telephony Configuration’ to check if everything is good.  If no problems exist, you will see the following:  Now the only thing left is to create voicemail boxes and you are good to go.
|
AuthorSaad is a Senior Collaboration Engineer. He is CCIE x 3 (Collaboration, R&S and Data Center) 
Categories
All
Archives
May 2022
|
 RSS Feed
